Hyundai Sonata LF: Front Seat / Front Seat Assembly Repair procedures
Hyundai Sonata LF 2014-2019 Service Manual / Body (Interior and Exterior) / Front Seat / Front Seat Assembly Repair procedures
| Replacement |
|

| 1. |
Remove the front anchor seat belt.
(Refer to Restraint - "EFD (Emergency Fastening Device) System") |
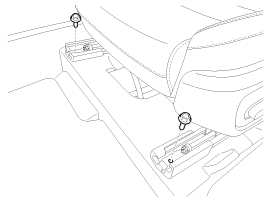
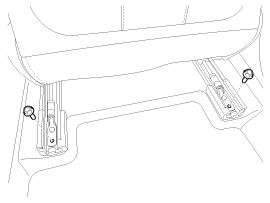
| 2. |
After loosening the mounting bolts, remove the front seat assembly.
[Front]
[Rear]
|
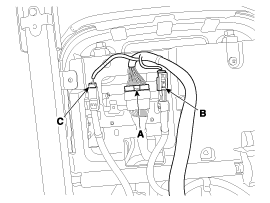
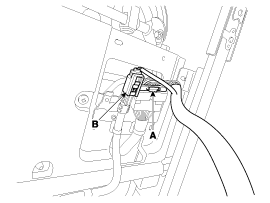
| 3. |
Disconnect the main connector (A), side airbag connector (B), front seat belt buckle connector (C).
[Driver's]
[Passenger's]
|
| 4. |
Install in the reverse order of removal.
|


Other information:
Hyundai Sonata LF 2014-2019 Service Manual: Intake Actuator Repair procedures
Inspection 1. Turn the ignition switch OFF. 2. Disconnect the intake actuator connector. 3. Verify that the intake actuator operates to the fresh position when connecting 12V to terminal 3 and grounding terminal 4. Verify that the intake actuator operates to the recirculation position when connected in reverse...
Hyundai Sonata LF 2014-2019 Service Manual: Power Seat Motor Components and Components Location
C..
Categories
- Manuals Home
- Hyundai Sonata Owners Manual
- Hyundai Sonata Service Manual
- General Information
- Emission Control System
- Audio
- New on site
- Most important about car

Copyright © 2026 www.hsonatalf.org