Hyundai Sonata: Air Bag - Advanced Supplemental Restraint System / How Does the Air Bag System Operate?
The SRS consists of the following components:
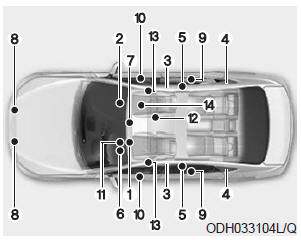
1. Driver's front air bag module
2. Passenger's front air bag module
3. Side air bag modules
4. Curtain air bag modules
5. Retractor pre-tensioner assemblies
6. Air bag warning light
7. SRS control module (SRSCM)/ Rollover sensor
8. Front impact sensors
9. Side impact sensors
10. Side pressure sensors
11. Driver's knee air bag module
12. Front passenger's seat belt buckle sensors
13. Anchor pre-tensioner
14. Occupant classification system
The SRSCM continually monitors all SRS components while the Engine Start/Stop button is in the ON position to determine if a crash impact is severe enough to require air bag deployment or pre-tensioner seat belt deployment.
SRS warning light

The SRS (Supplement Restraint System) air bag warning light on the instrument panel displays the air bag symbol depicted in the illustration. The system checks the air bag electrical system for malfunctions. The light indicates that there is a potential malfunction with your air bag system, which could include your side and curtain air bags used for rollover protection.
WARNING
If your SRS malfunctions, the air bag may not inflate properly during an accident increasing the risk of serious injury or death.
If any of the following conditions occur, your SRS is malfunctioning:
- The light does not turn on for approximately six seconds when the ignition switch is in the ON position.
- The light stays on after illuminating for approximately six seconds.
- The light comes on while the vehicle is in motion.
- The light blinks when the engine is running.
Have an authorized HYUNDAI dealer inspect the SRS as soon as possible if any of these conditions occur.
During a frontal collision, sensors will detect the vehicle's deceleration. If the rate of deceleration is high enough, the control unit will inflate the front air bags.
The front air bags help protect the driver and front passenger by responding to frontal impacts in which seat belts alone cannot provide adequate restraint. When needed, the side air bags help provide protection in the event of a side impact or rollover.
- Air bags are activated (able to inflate if necessary) only when the ignition switch is in the ON position.
- Air bags inflate in the event of certain frontal or side collisions to help protect the occupants from serious physical injury.
- There is no single speed at which the air bags will inflate. Generally, air bags are designed to inflate based upon the severity of a collision and its direction. These two factors determine whether the sensors produce an electronic deployment/ inflation signal.
- Air bag deployment depends on a number of factors including vehicle speed, angles of impact and the density and stiffness of the vehicles or objects which your vehicle impacts during a collision. The determining factors are not limited to those mentioned above.
- The front air bags will completely inflate and deflate in an instant. It is virtually impossible for you to see the air bags inflate during an accident. It is much more likely that you will simply see the deflated air bags hanging out of their storage compartments after the collision.
- In addition to inflating in certain side collisions, vehicles equipped with a rollover sensor, side and curtain air bags will inflate if the sensing system detects a rollover. When a rollover is detected, side and curtain air bags will remain inflated longer to help provide protection from ejection, especially when used in conjunction with the seat belts.
- To help provide protection, the air bags must inflate rapidly. The speed of air bag inflation is a consequence of extremely short time in which to inflate the air bag between the occupant and the vehicle structures before the occupant impacts those structures. This speed of inflation reduces the risk of serious or lifethreatening injuries and is thus a necessary part of air bag design. However, the rapid air bag inflation can also cause injuries which can include facial abrasions, bruises and broken bones because the inflation speed also causes the air bags to expand with a great deal of force.
- There are even circumstances under which contact with the air bag can cause fatal injuries, especially if the occupant is positioned excessively close to the air bag.
You can take steps to reduce the risk of being injured by an inflating air bag. The greatest risk is sitting too close to the air bag. An air bag needs about 10 inches (25 cm) of space to inflate. NHTSA recommends that drivers allow at least 10 inches (25 cm) between the center of the steering wheel and the chest.
WARNING
To reduce the risk of serious injury or death from an inflating air bag, take the following precautions:
- NEVER place a child restraint in the front passenger seat. Always properly restrain children under age 13 in the rear seats of the vehicle.
- Adjust the front passenger's and driver’s seats as far to the rear as possible while allowing you to maintain full control of the vehicle.
- Hold the steering wheel with hands at the 9 o'clock and 3 o'clock positions.
- Never place anything or anyone between the air bag and the seat occupant.
- Do not allow the front passenger to place their feet or legs on the dashboard.
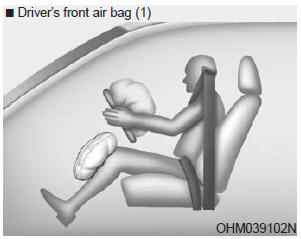
When the SRSCM detects a sufficiently severe impact to the front of the vehicle, it will automatically deploy the front air bags.
Upon deployment, tear seams molded directly into the pad covers will separate under pressure from the expansion of the air bags. Further opening of the covers allows full inflation of the air bags.
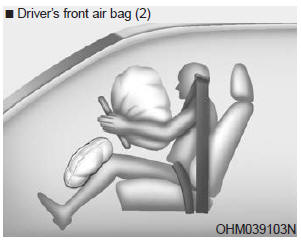
A fully inflated air bag, in combination with a properly worn seat belt, slows the driver or the front passenger forward motion, reducing the risk of head and chest injury.
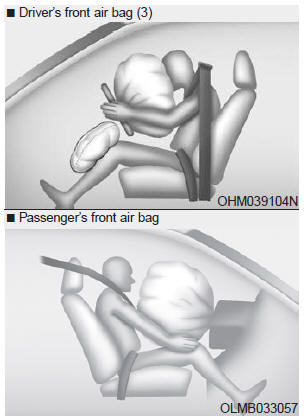
After complete inflation, the air bag immediately starts deflating, enabling the driver to maintain forward visibility and the ability to steer or operate other controls.
WARNING
To prevent objects from becoming dangerous projectiles when the passenger's air bag inflates:
- Do not install or place any objects (drink holder, CD holder, stickers, etc.) on the front passenger's panel above the glove box where the passenger's air bag is located.
- Do not install a container of liquid air freshener near the instrument cluster or on the instrument panel surface.
 Curtain air bags
Curtain air bags are located along both sides of the roof rails above the front
and rear doors.
They are designed to help protect the heads of the front seat occupants and the
rear outboard seat oc ...
 What to Expect After an Air Bag Inflates
After a frontal or side air bag inflates, it will deflate very quickly. Air bag
inflation will not prevent the driver from seeing out of the windshield or being
able to steer. Curtain air bags may r ...
Other information:
Hyundai Sonata LF 2014-2019 Owners Manual: Rear seat head restraints
The rear seats are equipped with head restraints in all the seating positions
for the passenger’s safety and comfort.
Adjusting the height up and down
To raise the head restraint:
1. Pull it up to the desired position (1).
To lower the head restraint:
1. Push and hold the release button (2) on ...
Hyundai Sonata LF 2014-2019 Owners Manual: Disc Brakes Wear Indicator
When your brake pads are worn and new pads are required, you will hear a high
pitched warning sound from your front or rear brakes. You may hear this sound come
and go or it may occur whenever you depress the brake pedal.
Please remember some driving conditions or climates may cause a brake squeal ...
